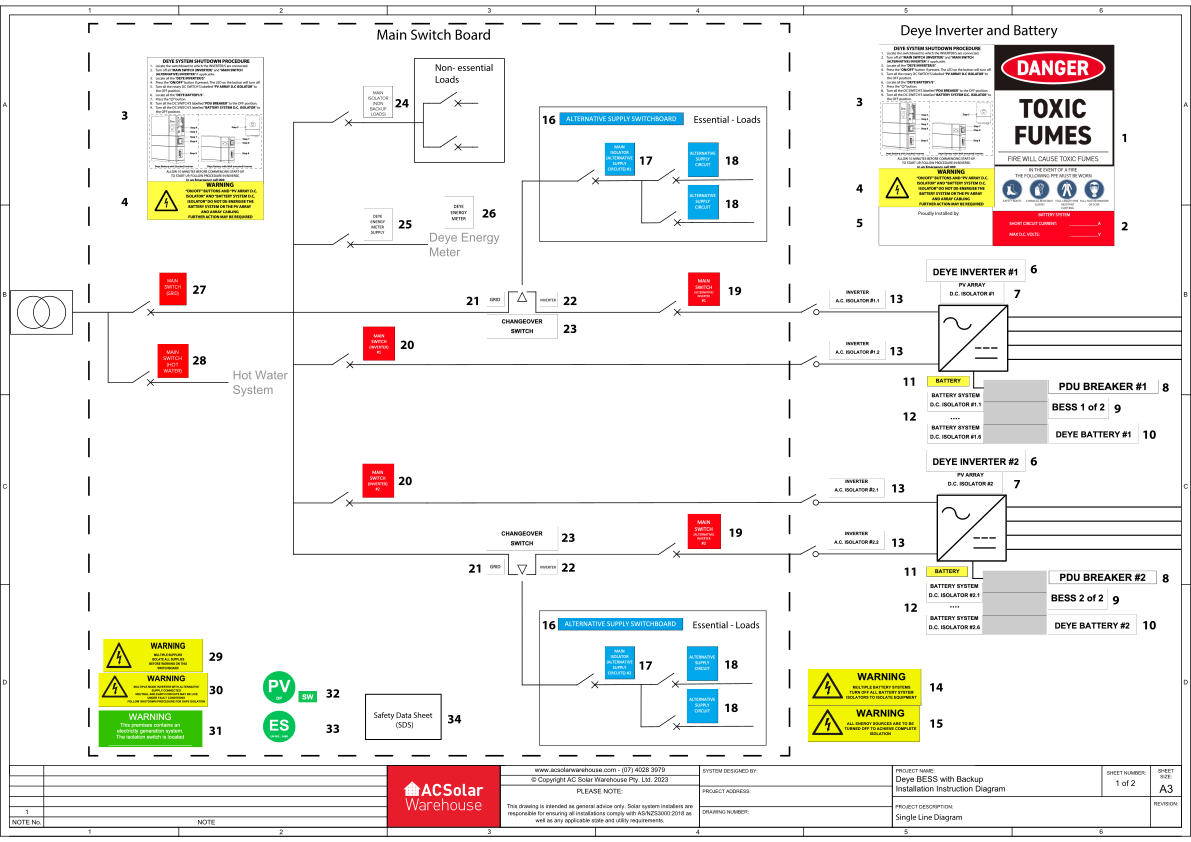
Deye BESS Label Location Diagram
Installers note: When the label plaque is installed outdoors, you must attach the provided engraved shutdown procedure, and yellow warning labels directly on top of the aluminium plaque to ensure compliance with AS/NZS 4777.1:2024 clause 6.1(c).
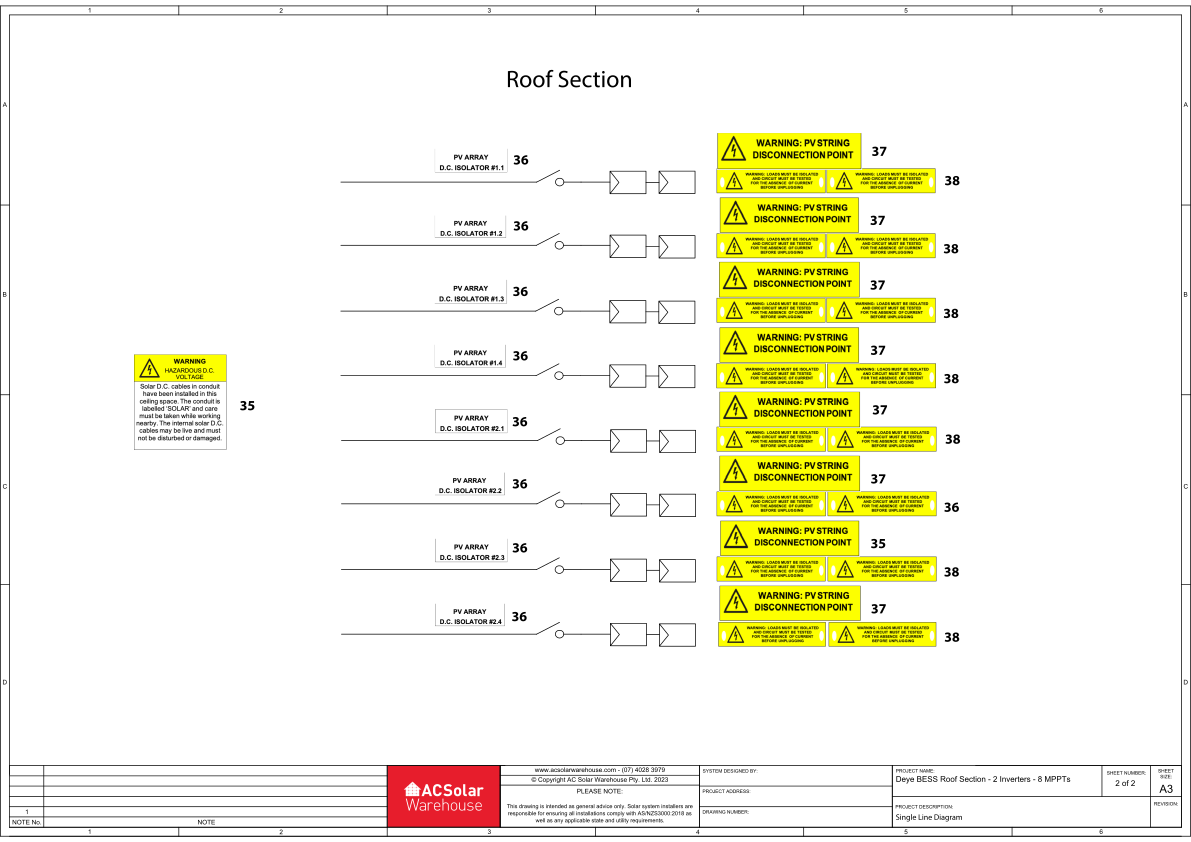
Rooftop Label Location Diagram
Individual label Breakdown
|
Label |
Instruction |
|
|
1 |
|
To be installed adjacent to battery enclosure or on all doors to the room where the battery is located.
|
|
2 |
|
To be installed adjacent to battery enclosure or on all doors to the room where the battery is located. Current and Voltage values to be filled out according to site specifics.
|
|
3 |
|
To be installed adjacent to the Deye battery and adjacent to the equipment to be operated in event of a shutdown (usually the switchboard the inverter is connected to).
|
|
4 |
|
To be installed below each shutdown procedure label. |
|
5 |
|
To be installed on the white space on the bottom left hand side of the plaque (if you wish), or any other location you prefer. Not a required label so can be omitted. Engrave details as you wish or stick your own logo/sticker on top. |
|
6 |
|
These labels shall be installed adjacent to each Deye inverter. Label kit includes suitable labels if 2 battery systems are installed, if there are more, additional labels need to be sourced. |
|
7 |
|
To be installed adjacent to each DC Switch (top right side as per shutdown procedure) on the Deye inverters. Label kit includes suitable labels if 2 battery systems are installed, if there are more, additional labels need to be sourced. |
|
8 |
|
To be installed adjacent to each Power Distribution Switch (right side of PDU module as per shutdown procedure). |
|
9 |
|
When more than 1 battery system (stacks of batteries) is installed, these labels shall be installed adjacent to each Deye battery. Label kit includes suitable labels if 2 battery systems are installed, if there are more, additional labels need to be sourced. When only 1 battery system is installed, neither of these labels is required. |
|
10 |
|
These labels shall be installed adjacent to each Deye battery. Label kit includes suitable labels if 2 battery systems are installed, if there are more, additional labels need to be sourced. |
|
11 |
|
To be installed on cabling or conduit between the inverter and battery stack at intervals not exceeding 2 metres. Not required where the inverter is stacked with the battery (no external cabling present). |
|
12 |
|
To be installed adjacent to each DC Switch (at left side panel as per shutdown procedure) on each Deye battery module. Label kit includes suitable labels if 2 battery systems are installed, if there are more, additional labels need to be sourced. |
|
13 |
|
If enclosed A.C. isolators are installed between the switchboard and the Deye inverters, install these labels adjacent to the relevant isolator/s. |
|
14 |
|
When more than 1 battery system (stacks of batteries) is installed, this label is required to be installed adjacent to 1 of the inverters. Not required when only one battery system is installed. |
|
15 |
|
Where both solar and a battery is installed, this label is to be installed adjacent to the inverters. |
|
16 |
|
To be installed to the switchboard where the system is configured for whole home backup, or where all load circuits within the distribution board or switchboard are backed up. |
|
17 |
|
To be installed adjacent to the main isolator in the essential loads. |
|
18 |
|
To be installed adjacent to each backed-up circuit. Label kit includes suitable labels for 17 backed-up circuits, if there are more, additional labels need to be sourced. |
|
19 |
|
Labels to be installed adjacent to each switch that the Deye inverter backup port are connected to. |
|
20 |
|
Labels to be installed adjacent to each switch that the Deye inverter grid port are connected to. |
|
21 |
|
To be installed adjacent to the changeover switch to match the corresponding position. |
|
22 |
|
To be installed adjacent to the changeover switch to match the corresponding position. |
|
23 |
|
To be installed adjacent to the changeover switch. |
|
24 |
|
To be installed adjacent to the main isolator for the non-backup loads. If there is no main isolator for these loads (or there is no non-backup loads), this label is not required. |
|
25 |
|
To be installed adjacent to the switch the Deye energy meter is connected to. If Deye energy meter has not installed, this label is not required. |
|
26 |
|
To be installed adjacent to the Deye energy meter. If Deye energy meter has not installed, this label is not required. |
|
27 |
|
To be installed adjacent to the main switch on the MSB. |
|
28 |
|
To be installed adjacent to the hot water main switch on the MSB. |
|
29 |
|
To be installed on the switchboard which the Deye inverter is directly connected to. |
|
30 |
|
To be installed on MSB to which the Deye inverter is directly connected. 1 label is provided in our kits, so if the Deye inverter is connected to a switchboard other than the MSB, additional labels need to be sourced. |
|
31 |
|
To be installed on the MSB. Only required in Victoria. |
|
32 |
|
To be installed on MSB and main metering panel. Label kit includes 1 label assuming the meter panel is the same location as the MSB, if this is not the case an additional label is required. Install the “SW” label on top of the “DP” where rooftop DC isolators are used instead of disconnection points. |
|
33 |
|
To be installed on MSB and main metering panel. Label kit includes 1 label assuming the meter panel is the same location as the MSB, if this is not the case an additional label is required. |
|
34 |
|
To be installed on MSB or meter box and Fire panel. |


Roof Section
|
35 |
|
Where DC cabling is installed within a ceiling space, this label is to be installed adjacent to the access point into the ceiling.
|
|
36 |
|
To be installed adjacent on each DC isolator (not required if disconnection points are used instead of rooftop isolators). |
|
37 |
|
To be attached to the PV module or structure within 300mm of all disconnection points (not required if rooftop isolators are used instead of disconnection points). |
|
38 |
|
To be attached (typically zip tied) to positive and negative cables of all disconnection points (not required if rooftop isolators are used instead of disconnection points). |


Labels required for all installations, which are not included in our kit.
|
|
To be attached on DC cabling from the array to the inverter at intervals not less than 2m and at every change of direction. These labels are not included in the label kit and must be sourced separately. |
|
|
|
To be installed on MSB and fire panel shown on a plan (Map or drawing) when the battery system locations that are difficult to find or where the inverter (IES) is not within 3 meters and fully visible from the switchboard. This sign must indicate location of shutdown procedure and inverter. This label does not include in the label kit and must be sourced separately. |
|
|
|
To be installed on MSB and fire panel shown on a plan (Map or drawing). This label does not include in the label kit and must be sourced separately. |